How to Design a Digital Scrolling Text Display With Arduino and P10 LED Dot Matrix Display
A digital scrolling text display is an innovative system for showcasing information or announcements on an LED-based board. Whether for advertising, informational purposes, or creative projects, this technology offers an engaging way to display pre-programmed messages. In this tutorial, you’ll learn how to create your own scrolling text display using an Arduino Uno and a P10 LED dot matrix display module.
What is a Digital Scrolling Text Display?
A digital scrolling text display utilizes an LED array to show text that scrolls across the screen. The data displayed is programmed using a microcontroller, often referred to as a “Control Card.” While there are many types of control cards, the Arduino Uno paired with the Arduino DMD library makes it simple to program and control a P10 LED dot matrix display.
P10 LED dot matrix displays come in various colors, allowing for flexibility in design and use. By combining multiple P10 modules, you can create larger displays for bigger projects.
Materials Needed
To build your scrolling text display, gather the following components:

- Arduino Uno board (1 piece)
- P10 LED Dot Matrix Display (DMD) Module (3 pieces)
- 5V, 5A Power Supply
- Ribbon Cables (3 pieces)
- Power Supply Cables
- Bunch of Jumper Wires
Why Choose Arduino for Scrolling Text Displays?
Arduino simplifies the programming process, making it accessible even for beginners. Using the Arduino DMD library, you can easily control the P10 LED modules to create smooth scrolling text effects. This library eliminates the complexity of working directly with the display hardware, allowing you to focus on creativity and functionality.
Key Benefits of Building a Scrolling Text Display
- Cost-Effective Solution: DIY scrolling displays are significantly cheaper than commercial systems.
- Customizable: Program text or messages specific to your needs.
- Scalable: Add more P10 modules to increase the display size.
- Versatile: Use for advertising, event announcements, or educational purposes.
Steps to Build Your Scrolling Text Display
This tutorial walks you through the entire process of connecting your hardware, programming the Arduino Uno, and running the scrolling text display.
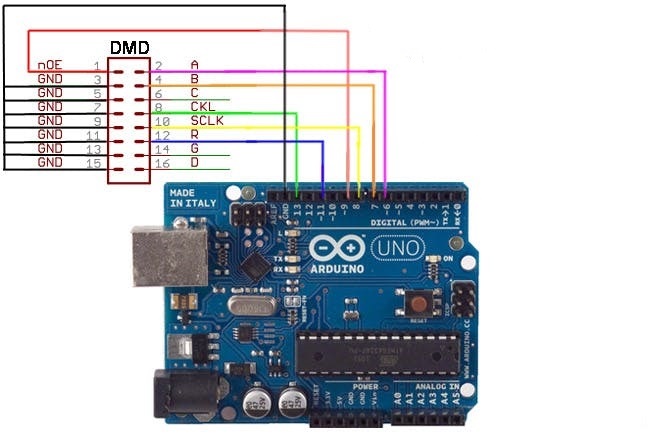
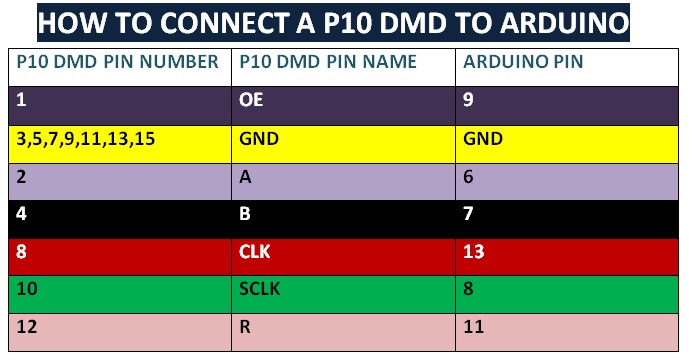
Circuit diagram of the Scrolling text display with Arduino
The DMD library can be downloaded here
Here is a step by step tutorial on how to install arduino library.
*** Make sure to also download and install the TimerOne library on the Arduino IDE.
Arduino Code for Scrolling Text DisplayProject
#include <SPI.h>
#include <DMD.h>
#include <TimerOne.h>
#include <Arial14.h>
#include <Arial_black_16.h>
#include <Arial14.h>
#include <SystemFont5x7.h>
#define DISPLAYS_ACROSS 3
#define DISPLAYS_DOWN 1
DMD dmd( DISPLAYS_ACROSS , DISPLAYS_DOWN );

void ScanDMD() {
dmd.scanDisplayBySPI();
}

void setup() {
Serial.begin(9600);
Timer1.initialize( 2000 );
Timer1.attachInterrupt( ScanDMD );
dmd.clearScreen( true );
}
String textToScroll= "ettronics.com...Digital scrolling text display. Please subscribe, like, comment and share.";

void drawText1( String dispString )

{
dmd.clearScreen( true );
dmd.selectFont( Arial_Black_16 );
char newString[256];
int sLength = dispString.length();
dispString.toCharArray( newString, sLength+1 );
dmd.drawMarquee( newString , sLength , ( 32*DISPLAYS_ACROSS )-1 ,0);
long start=millis();
long timer=start;
long timer2=start;
boolean ret=false;
while( !ret ) {
if ( ( timer+20 ) <millis() )
{
ret=dmd.stepMarquee( -1 , 0 );
timer=millis();
}
}
}

void loop() {
Serial.println(textToScroll);
drawText1(textToScroll);
}
Conclusion
Creating a digital scrolling text display using an Arduino Uno and P10 LED dot matrix modules is a rewarding project that combines innovation and practicality. Whether you’re building it for advertisements, event notices, or personal projects, this DIY approach gives you full control over the design and functionality of your display.
With the help of the Arduino DMD library, programming and controlling your P10 LED modules becomes simple and efficient. As you experiment with this project, you’ll not only enhance your Arduino skills but also gain a deeper understanding of LED matrix displays and microcontroller programming.
We hope this tutorial inspires you to take on new challenges and explore the endless possibilities of Arduino projects. If you have any questions or need further guidance, feel free to leave a comment below. Happy building!
If you want to learn practical electronics circuit design, then consider checking out our course: Practical electronics circuit design.
This course will teach you everything you need to know to start designing electronics circuits yourself from scratch.