The Ettronics Hightech Robotic Car is an Arduino-based educational robot designed to introduce learners to Arduino programming, sensors, motor control, and autonomous robotics. The same robotic car can be programmed to perform different tasks, including obstacle avoidance, obstacle following, and remote-controlled operation.
In our previous tutorial, we programmed the Ettronics Hightech Robotic Car to operate as an obstacle avoidance robot. In that mode, the robot detects an obstacle in front of it and then takes action to avoid it.
In this tutorial, we are going to program the same robotic car to operate as an obstacle following robot.
This time, instead of avoiding the object in front of it, the robot will use the HC-SR04 ultrasonic sensor to monitor the distance between itself and the object. Depending on that distance, it will either move forward, stop, or reverse.
The robot is programmed using an Arduino Nano, an HC-SR04 ultrasonic sensor, and an L9110 motor driver. As with the previous tutorial, the Arduino Nano can be programmed using an Android smartphone and the ArduinoDroid app, so a computer is not required.
Watch the Robotic Car Assembly and Wiring Tutorial First
Before programming the robotic car, the components need to be properly assembled and connected.
If you have not yet assembled your Ettronics Hightech Robotic Car, watch our robotic car assembly and wiring tutorial first. In that video, we demonstrate how to assemble the mechanical parts of the car and connect the Arduino Nano, L9110 motor driver, ultrasonic sensor, motors, and other components.
Watch how to Program the Ettronics Hightech Obstacle Following Robot
Ettronics Hightech Robotic Car Kit | Full Assembly & Connection Guide
After completing the assembly and connections, you can proceed with this programming tutorial.
If you are yet to get the Ettronics Hightech Robotic Car, you can click here to purchase it.
BUY THE ETTRONICS HIGHTECH ROBOTIC CAR KIT
Watch How to Program The Ettronics Hightech Obstacle Following Robot
What You Need
For this tutorial, you need:
- Assembled Ettronics Hightech Robotic Car kit
- Android smartphone
- USB OTG adapter
- USB cable for the Arduino Nano
- ArduinoDroid app
- The obstacle following program provided in this tutorial
Your Android phone should be running Android 8.0 or later.
How the Obstacle Following Robot Works
The basic idea behind this project is simple.
The HC-SR04 ultrasonic sensor measures the distance between the robotic car and the object in front of it. The Arduino Nano then uses that distance to decide what the car should do.
There are several distance points programmed into the robot.
The main stop limit is:
#define STOP_DISTANCE 55This means that when the object is more than 55 cm away, the robot stops.
When an object is detected at 55 cm or less, the robot starts applying the obstacle-following instructions.
The programmed following range is:
#define FOLLOW_DISTANCE_MIN 25
#define FOLLOW_DISTANCE_MAX 45
This means:
- More than 55 cm: Stop.
- More than 45 cm but 55 cm or less: Move forward at maximum speed to get closer to the object.
- 25–45 cm: Continue moving forward at maximum speed.
- 15–25 cm: Stop briefly, then move forward again.
- Less than 15 cm: Reverse briefly to create more space, then move forward again.
So the robot does not simply chase an object from any distance. If the object is farther than 55 cm, the robot stops and waits for the object to come within its programmed detection range.
The behavior can be summarized as:
Object farther than 55 cm → STOP
Object between 45 and 55 cm → MOVE FORWARD
Object between 25 and 45 cm → MOVE FORWARD
Object between 15 and 25 cm → STOP briefly, then MOVE FORWARD
Object closer than 15 cm → REVERSE, then MOVE FORWARD
Arduino Nano and the CH340 USB Interface
The controller used in this robotic car is the Arduino Nano based on the ATmega328P.
This particular Nano uses the CH340 USB-to-serial interface for communication between the Arduino and the USB port.
This is important when programming the board from an Android phone because the phone needs to communicate with the Nano through its USB interface.
Connecting the Android Phone to the Arduino Nano
The first thing you need is a USB OTG adapter.
Connect the components as follows:
Android phone → OTG adapter → USB cable → Arduino Nano
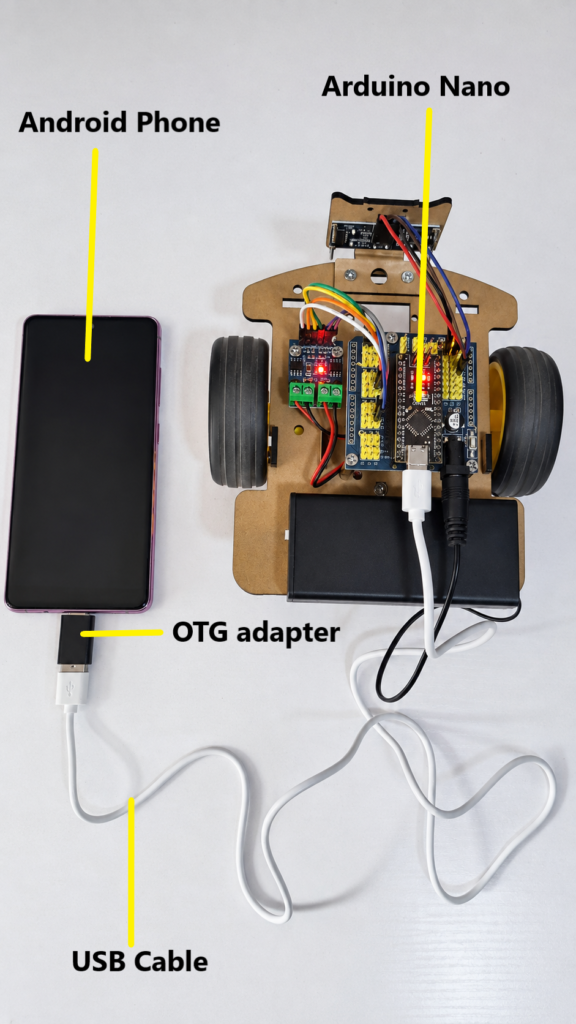
Once connected, Android may display a message asking whether you want to allow the ArduinoDroid application to access the connected USB device.
Allow the connection.
If ArduinoDroid does not detect the board immediately, check that:
- The OTG adapter is properly connected.
- Your phone supports USB OTG.
- The USB cable supports data communication and is not only a charging cable.
- The Arduino Nano is receiving power.
- ArduinoDroid has permission to access the USB device.
Install ArduinoDroid
Install the ArduinoDroid application on your Android phone.
The phone used for this tutorial should have Android 8.0 or newer.
ArduinoDroid provides an Arduino development environment directly on an Android device, allowing you to write, compile, and upload Arduino programs without using a computer.
Once the application is installed, connect the Arduino Nano to your phone through the USB OTG adapter.
Arduino Nano Connections
The Arduino Nano is connected to the L9110 motor driver through the Arduino-compatible extension board used in the Ettronics Hightech Robotic Car.
The motor control connections are:
| Arduino Nano | L9110 Motor Driver |
|---|---|
| D5 | A-1A |
| D6 | A-1B |
| D9 | B-1A |
| D10 | B-2B |
The HC-SR04 ultrasonic sensor is connected as follows:
| HC-SR04 | Arduino Nano |
| VCC | 5V |
| GND | GND |
| TRIG | A4 |
| ECHO | A5 |
The Arduino uses these pins to control the two motors and communicate with the ultrasonic sensor.
Setting Up ArduinoDroid
After connecting the Nano to your Android phone, open ArduinoDroid.
Create a new Arduino sketch and select the appropriate Arduino board.
To do so:
- Click on the three dots on the top right corner of the app.
- Click Settings.
- Click Board Type.
- Click Arduino.
- Scroll up and select Nano w/ Atmega/CH340G.
The Obstacle Following Program
The following is the program used for the Ettronics Hightech Obstacle Following Robotic Car.
The motor and ultrasonic sensor connections remain the same as in the previous project. The major change is the program logic.
Instead of checking for an obstacle and then turning away from it, the Arduino continuously checks the measured distance and decides whether the robot should move forward, stop, or reverse.
The robot uses a maximum forward speed of 255.
// Ettronics.com
// Obstacle Following Robotic Car
// Maximum speed at all times

// Motor direction definitions
#define stop     0
#define forward  1
#define back     2
#define left     3
#define right    4

// Ultrasonic sensor pins (unchanged)
#define Trig A4
#define Echo A5

// Speed settings - MAX SPEED ONLY
#define MAX_SPEED 255        // Always at maximum speed
#define REVERSE_SPEED 200    // Reverse speed when too close

// Obstacle following settings
#define FOLLOW_DISTANCE_MIN 25   // Minimum distance to maintain (cm)
#define FOLLOW_DISTANCE_MAX 45   // Maximum distance to maintain (cm)

// Turning settings
#define TURN_SPEED 255      // Maximum speed for turning
#define TURN_DELAY 50       // Quick turns
#define REVERSE_TIME 200    // Reverse time

// Ultrasonic sensor filtering
#define SENSOR_SAMPLES 5     // Stable readings
#define MAX_VALID_DISTANCE 400

// Following behavior settings
#define STOP_DISTANCE 55     // Distance at which car stops (obstacle too far)
#define DEADZONE 3           // Small deadzone to prevent hunting

// Setup
void setup()
{
    // Motor pins (unchanged)
    pinMode(5, OUTPUT);
    pinMode(6, OUTPUT);
    pinMode(9, OUTPUT);
    pinMode(10, OUTPUT);

    // Ultrasonic sensor pins (unchanged)
    pinMode(Trig, OUTPUT);
    pinMode(Echo, INPUT);

    // Initialize random seed
    randomSeed(analogRead(A0));

    // Stop the car at startup
    motor(stop, 0, 0);
    delay(500);
}

// Main program
void loop()
{
    float distance = GetFilteredDistance();

    // If obstacle is within detectable and following range
    if (distance > 0 && distance <= STOP_DISTANCE)
    {
        followObstacle(distance);
    }
    else
    {
        // Obstacle too far or not detected - STOP
        motor(stop, 0, 0);
    }

    delay(10); // Fast loop for quick response
}

// Get one distance measurement from the ultrasonic sensor
float GetSingleDistance()
{
    long duration;

    digitalWrite(Trig, LOW);
    delayMicroseconds(2);
    digitalWrite(Trig, HIGH);
    delayMicroseconds(10);
    digitalWrite(Trig, LOW);

    duration = pulseIn(Echo, HIGH, 30000);

    if (duration == 0)
    {
        return -1;
    }

    float distance = duration / 58.0;

    if (distance <= 0 || distance > MAX_VALID_DISTANCE)
    {
        return -1;
    }

    return distance;
}

// Take multiple readings and calculate their average
float GetFilteredDistance()
{
    float readings[SENSOR_SAMPLES];
    int validReadings = 0;

    for (int i = 0; i < SENSOR_SAMPLES; i++)
    {
        float distance = GetSingleDistance();

        if (distance > 0)
        {
            readings[validReadings] = distance;
            validReadings++;
        }

        delay(3);
    }

    if (validReadings == 0)
    {
        return MAX_VALID_DISTANCE;
    }

    // Sort readings to remove outliers
    for (int i = 0; i < validReadings - 1; i++)
    {
        for (int j = 0; j < validReadings - i - 1; j++)
        {
            if (readings[j] > readings[j + 1])
            {
                float temp = readings[j];
                readings[j] = readings[j + 1];
                readings[j + 1] = temp;
            }
        }
    }

    // Use median for stable readings
    return readings[validReadings / 2];
}

// Control Motor 1
void motor1(int speed1, int speed2)
{
    analogWrite(5, speed1);
    analogWrite(6, speed2);
}

// Control Motor 2
void motor2(int speed1, int speed2)
{
    analogWrite(9, speed1);
    analogWrite(10, speed2);
}

// Control the direction and speed of the car
void motor(int dir, int speed1, int speed2)
{
    switch (dir)
    {
        case stop:
            motor1(0, 0);
            motor2(0, 0);
            break;

        case forward:
            motor1(speed1, 0);
            motor2(speed2, 0);
            break;

        case back:
            motor1(0, speed1);
            motor2(0, speed2);
            break;

        case left:
            motor1(0, speed1);
            motor2(speed2, 0);
            break;

        case right:
            motor1(speed1, 0);
            motor2(0, speed2);
            break;

        default:
            motor1(0, 0);
            motor2(0, 0);
            break;
    }
}

// Follow the obstacle - always at maximum speed
void followObstacle(float distance)
{
    // Check if obstacle is within following range
    if (distance > FOLLOW_DISTANCE_MAX)
    {
        // Obstacle is too far - go MAX SPEED to catch up
        motor(forward, MAX_SPEED, MAX_SPEED);
    }
    else if (distance < FOLLOW_DISTANCE_MIN)
    {
        // Obstacle is too close - slow down or reverse
        if (distance < 15)
        {
            // Too close - reverse to create space
            motor(back, REVERSE_SPEED, REVERSE_SPEED);
            delay(REVERSE_TIME);
            motor(stop, 0, 0);

            // Slight turn to maintain following position
            delay(100);

            // Then go forward at max speed again
            motor(forward, MAX_SPEED, MAX_SPEED);
        }
        else
        {
            // Slightly too close - stop and wait
            motor(stop, 0, 0);
            delay(100);

            // Then go forward at max speed
            motor(forward, MAX_SPEED, MAX_SPEED);
        }
    }
    else
    {
        // Within ideal following range - MAX SPEED
        motor(forward, MAX_SPEED, MAX_SPEED);
    }
}
Understanding the Important Parts of the Program
You don’t need to understand every line before uploading the program. However, understanding the major sections will help you modify the robot later and develop your own robotic projects.
1. Defining the Motor Directions
At the beginning of the program, we define four movement directions and a stop command:
#define stop     0
#define forward  1
#define back     2
#define left     3
#define right    4
These names make the rest of the program easier to understand.
Instead of writing complicated motor commands every time we want the robot to move, we can simply write:
motor(forward, 255, 255);or:
motor(stop, 0, 0);2. Ultrasonic Sensor Connections
The HC-SR04 uses two signal pins.
The TRIG pin sends the ultrasonic pulse, while the ECHO pin receives the reflected signal.
In our robot:
#define Trig A4
#define Echo A5
Therefore:
- TRIG → A4
- ECHO → A5
The sensor is powered from the Arduino’s 5 V and GND connections.
3. Controlling the Motors
The L9110 motor driver allows the Arduino to control the direction and speed of the two motors.
The connections are:
| Arduino Nano | L9110 |
| D5 | A-1A |
| D6 | A-1B |
| D9 | B-1A |
| D10 | B-2B |
The Arduino uses PWM signals on these pins to control the motor speed.
For example:
motor(forward, MAX_SPEED, MAX_SPEED);commands both motors to move the robot forward at maximum PWM speed.
4. Maximum Forward Speed
The forward motor speed is defined as:
#define MAX_SPEED 255The Arduino’s PWM output uses values from 0 to 255, making 255 the maximum value.
Whenever the robot is commanded to move forward in this program, it uses this maximum value.
The reverse speed is set separately:
#define REVERSE_SPEED 200So the robot reverses at 200 when it gets very close to the object.
5. Setting the Following Distance
The following range is controlled by:
#define FOLLOW_DISTANCE_MIN 25
#define FOLLOW_DISTANCE_MAX 45
The minimum distance is 25 cm, while the maximum following distance is 45 cm.
When the object is between these two values, the program commands the robot to move forward at maximum speed.
If the object moves beyond 45 cm but remains within the 55 cm stop limit, the robot also moves forward to reduce the distance.
6. The 55 cm Stop Limit
One of the most important settings in this program is:
#define STOP_DISTANCE 55This is checked in the main loop():
if (distance > 0 && distance <= STOP_DISTANCE)
{
    followObstacle(distance);
}
else
{
    motor(stop, 0, 0);
}
This means the robot only enters the following routine when a valid object is detected at 55 cm or less.
If the measured distance is greater than 55 cm, the robot stops.
This is an important part of the robot’s behavior. It prevents the car from continuously driving forward when there is no object within its programmed following distance.
7. Taking Multiple Ultrasonic Readings
Instead of relying on one ultrasonic measurement, the program takes five readings:
#define SENSOR_SAMPLES 5The readings are stored and sorted.
The program then returns the middle reading:
return readings[validReadings / 2];This is a median reading, rather than an average.
Using the median helps reduce the effect of an unusually high or low measurement and can make the robot’s response more stable.
8. When the Object Is Between 45 and 55 cm
This is the catch-up zone.
If the object is more than 45 cm away but not more than 55 cm away, the followObstacle() function sees:
if (distance > FOLLOW_DISTANCE_MAX)Since FOLLOW_DISTANCE_MAX is 45 cm, the robot moves forward:
motor(forward, MAX_SPEED, MAX_SPEED);So, for example, if the object is 50 cm away, the robot moves forward at maximum speed.
However, if the object moves beyond 55 cm, the main loop stops the robot.
9. When the Object Is Between 25 and 45 cm
This is the programmed following range.
When the distance is between 25 cm and 45 cm, neither of the first two conditions in followObstacle() is triggered.
The program therefore reaches:
else
{
    motor(forward, MAX_SPEED, MAX_SPEED);
}
The robot continues moving forward at maximum speed.
10. When the Object Is Between 15 and 25 cm
When the distance becomes less than 25 cm, the robot enters this section:
else if (distance < FOLLOW_DISTANCE_MIN)The program then checks whether the object is closer than 15 cm.
If it is not, the robot stops briefly:
motor(stop, 0, 0);
delay(100);
After that, it commands the robot to move forward again at maximum speed.
11. When the Object Is Less Than 15 cm Away
If the object gets closer than 15 cm, the robot reverses:
motor(back, REVERSE_SPEED, REVERSE_SPEED);
delay(REVERSE_TIME);
The reverse speed is 200 and the reverse time is 200 milliseconds.
After reversing, the robot stops briefly and then moves forward again at maximum speed.
This gives the robot a way to create some space when it gets too close to the object.
Compiling and Uploading the Code
After copying the complete program into ArduinoDroid:
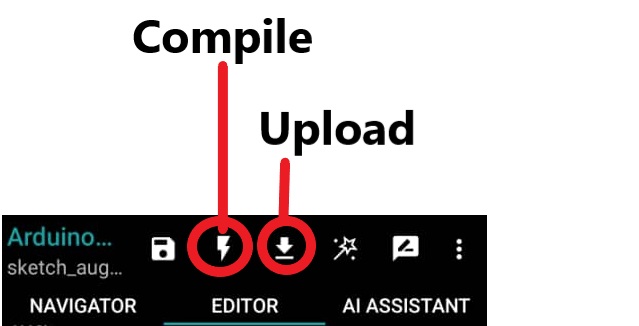
- Copy the whole code and paste it into the editor environment.
- Click the Compile button.
- Wait for the code to finish compiling.
- Click the Upload button.
- Wait for the code to finish uploading to the Arduino Nano.
Once the code has been uploaded, unplug the robotic car from the phone.
Place the car on the floor and turn on the battery switch.
Place an object in front of the car and move it slowly toward and away from the robot.
The robot should respond according to the programmed distance ranges.
Testing the Robotic Car
For the first test, place the car on a suitable surface with enough space around it.
Place an object directly in front of the HC-SR04 ultrasonic sensor.
Try moving the object closer to and farther away from the robot.
The expected behavior is:
More than 55 cm
The robot should stop.
Between 45 and 55 cm
The robot should move forward at maximum speed to reduce the distance.
Between 25 and 45 cm
The robot should continue moving forward at maximum speed.
Between 15 and 25 cm
The robot should stop briefly and then move forward again.
Less than 15 cm
The robot should reverse briefly, stop, and then move forward again.
Because the robot always moves forward at maximum speed when commanded to move forward, you may need to test it carefully and make adjustments to the distance settings depending on the surface and the object being followed.
Adjusting the Robot
One of the advantages of using Arduino is that you can easily modify the program to change how the robot behaves.
Following Distance
To change the minimum following distance, modify:
#define FOLLOW_DISTANCE_MIN 25For example:
#define FOLLOW_DISTANCE_MIN 30To change the maximum following distance, modify:
#define FOLLOW_DISTANCE_MAX 45For example:
#define FOLLOW_DISTANCE_MAX 50Remember that these values work together with the STOP_DISTANCE setting.
Stop Distance
The maximum distance at which the robot will respond to an object is controlled by:
#define STOP_DISTANCE 55For example:
#define STOP_DISTANCE 70would allow the robot to respond to an object up to approximately 70 cm away.
Reverse Speed
The reverse speed is controlled by:
#define REVERSE_SPEED 200You can adjust this value depending on how quickly you want the robot to reverse when the object becomes too close.
Reverse Time
The amount of time the robot spends reversing is controlled by:
#define REVERSE_TIME 200Increasing this value makes the robot reverse for a longer period.
Troubleshooting
The Arduino Nano is not detected by the phone
Check:
- USB OTG is enabled or supported by the phone.
- The USB cable supports data communication.
- The Nano is receiving power.
- ArduinoDroid has USB permission.
- The correct Arduino Nano board is selected.
- The CH340-based Nano is properly connected.
The robot moves in the wrong direction
Check the motor connections and the motor direction definitions in the program.
If necessary, the motor control logic can be changed to reverse the direction of a motor.
The robot stops even though the object is in front of it
Check the distance between the object and the ultrasonic sensor.
Remember that the robot is programmed to stop when the measured distance is greater than 55 cm.
Also make sure that the HC-SR04 is properly connected and facing the object.
The robot gets too close to the object
You can increase:
#define FOLLOW_DISTANCE_MIN 25For example:
#define FOLLOW_DISTANCE_MIN 30This changes the point at which the robot considers the object too close.
You can also adjust the reverse time:
#define REVERSE_TIME 200The ultrasonic readings are unstable
Make sure the HC-SR04 is firmly mounted and facing forward.
The robot takes five readings and uses the median value to reduce the effect of unstable measurements.
However, excessive vibration, poor sensor mounting, or unsuitable objects can still affect ultrasonic readings.
Obstacle Avoidance vs. Obstacle Following
The interesting thing about the Ettronics Hightech Robotic Car is that the hardware does not have to change for these two projects.
The same Arduino Nano, L9110 motor driver, motors, and HC-SR04 ultrasonic sensor can be used for both.
What changes is the programming logic.
In the obstacle avoidance project, the robot detects an obstacle and tries to get around it.
In this project, the robot uses the distance measured by the ultrasonic sensor to determine whether it should move forward, stop, or reverse.
This is a good example of how programming can change the behavior of a robot without changing its physical hardware.
Programming the Robot with a Computer
The Ettronics Hightech Robotic Car can also be programmed using a computer.
If you prefer using a computer instead of an Android phone, the Arduino Nano can be connected to the computer through USB and programmed using the Arduino IDE.
Conclusion
The Ettronics Hightech Robotic Car is more than just a small robot that moves around. It provides a practical way to learn how microcontrollers, ultrasonic sensors, motor drivers, PWM, distance measurement, and programming logic work together.
In this tutorial, we programmed the robotic car to operate as an obstacle following robot.
The HC-SR04 ultrasonic sensor measures the distance to an object in front of the car, while the Arduino Nano uses that information to control the motors.
The robot is programmed to stop when the object is more than 55 cm away, move forward when the object is between 45 and 55 cm away, continue moving when it is within the 25–45 cm following range, and take corrective action when the object gets too close.
You can experiment with the different distance values and see how changing a few lines of code changes the way the robot behaves.
This project also provides a foundation for more advanced robotic projects. You can later add features such as Bluetooth control, line following, remote control, multiple operating modes, additional sensors, and more advanced autonomous behavior.
To learn practical electronics, Arduino, robotics, and electronics circuit design, visit Ettronics.com.