Measuring distance without touching an object is one of the most useful applications of electronics and embedded systems. From automatic doors and robot navigation to parking assistance systems and industrial automation, contactless distance measurement is widely used in modern technology.
In this tutorial, you will learn how to build a digital distance meter using an Arduino Uno, an HC-SR04 Ultrasonic Sensor, and a 16×2 LCD Display. By the end of this project, your Arduino will continuously measure the distance to an object and display the measurement in real time on an LCD screen.
This project is suitable for beginners who already have basic knowledge of Arduino programming and breadboard connections.
Project Demonstration
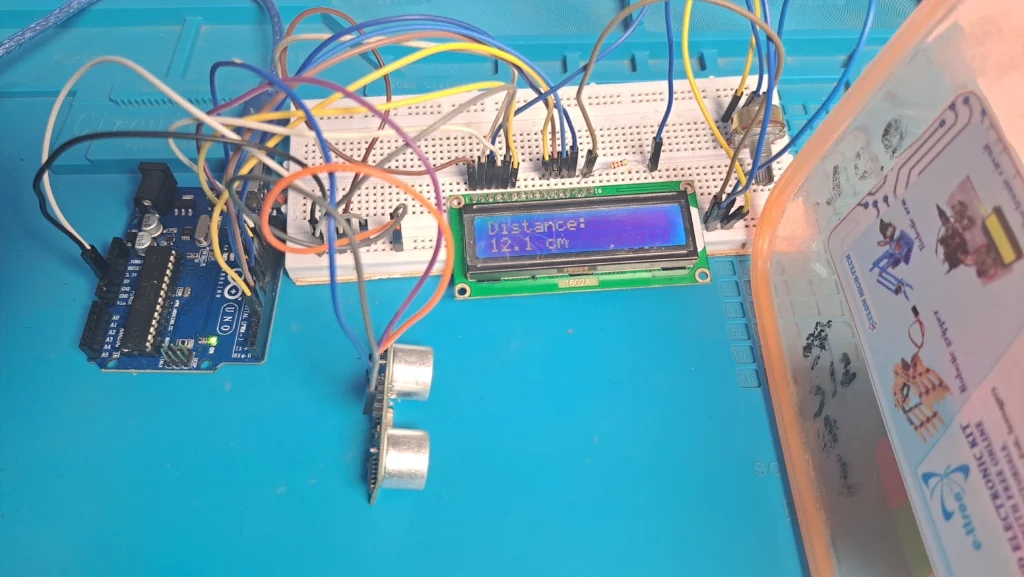
When the project is completed:
- The ultrasonic sensor continuously measures the distance to an object.
- The Arduino processes the measurement.
- The measured distance is displayed instantly on the LCD.
- If no valid object is detected, the LCD displays Out of Range.
Learning Objectives
After completing this project, you will understand how to:
- Interface an HC-SR04 Ultrasonic Sensor with Arduino
- Connect and control a 16×2 LCD Display
- Measure distance using ultrasonic waves
- Display real-time sensor data on an LCD
- Use Arduino libraries in your programs
- Build practical embedded systems
Components Required
| Component | Quantity |
|---|---|
| Arduino Uno R3 | 1 |
| HC-SR04 Ultrasonic Sensor | 1 |
| 16×2 LCD Display | 1 |
| 5k Potentiometer | 1 |
| 220Ω Resistor | 1 |
| Breadboard | 1 |
| Jumper Wires | Several |
| USB Cable | 1 |
How the Ultrasonic Sensor Works
The HC-SR04 ultrasonic sensor measures distance using high-frequency sound waves of about 40,000Hz or 40kHz
It has four pins:
- VCC
- Trig
- Echo
- GND
The sensor also contains:
- One transmitter
- One receiver
The Arduino sends a short pulse to the Trig pin.
The sensor then emits an ultrasonic wave (approximately 40 kHz).
When this sound wave hits an object, it reflects back toward the sensor.
The sensor detects the returning echo and sends the information back to the Arduino.
The Arduino measures how long the sound took to travel to the object and back.
Using the speed of sound (approximately 340 m/s), the Arduino calculates the distance.
The calculated value is then displayed on the LCD.
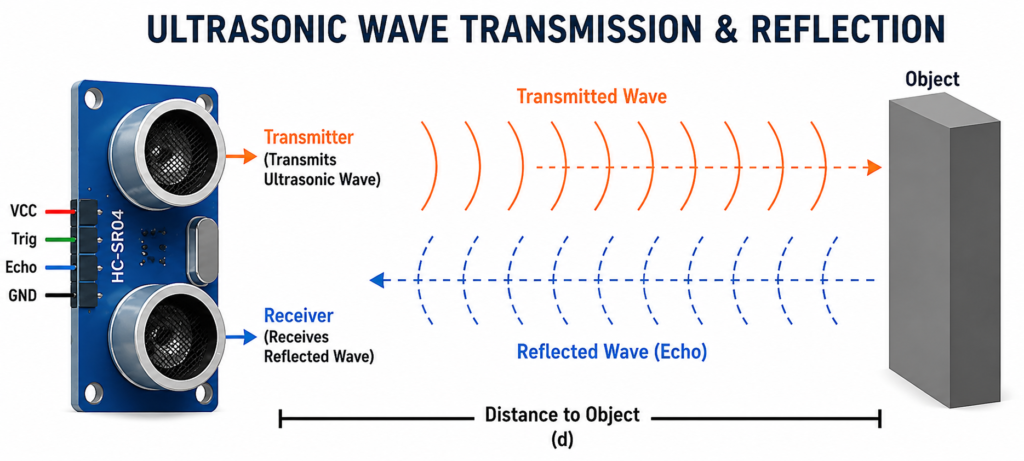
Insert illustration showing ultrasonic wave transmission and reflection
Understanding the LCD Display
The 16×2 LCD contains:
- 16 columns
- 2 rows
It allows us to display text, numbers, and sensor readings.
A 5k potentiometer is connected to adjust the LCD contrast for clear visibility.
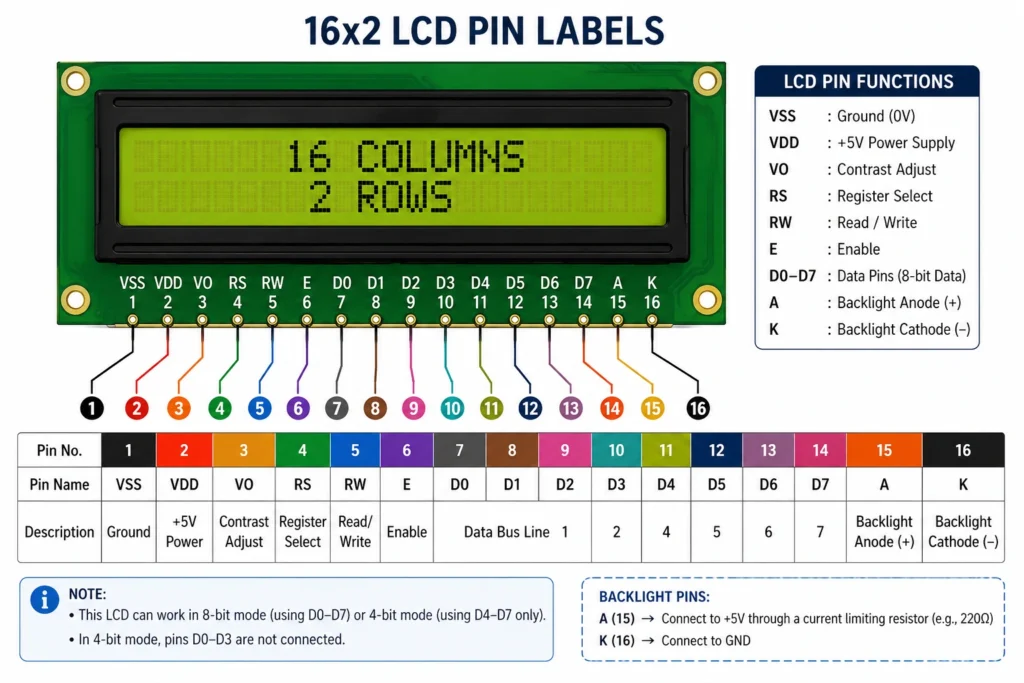
Circuit Diagram
The circuit consists of three major sections:
- Arduino Uno
- HC-SR04 Ultrasonic Sensor
- 16×2 LCD Display
The ultrasonic sensor connects to Arduino digital pins.
The LCD communicates with the Arduino using 4-bit mode.
The potentiometer controls LCD contrast.
The resistor limits current through the LCD backlight.
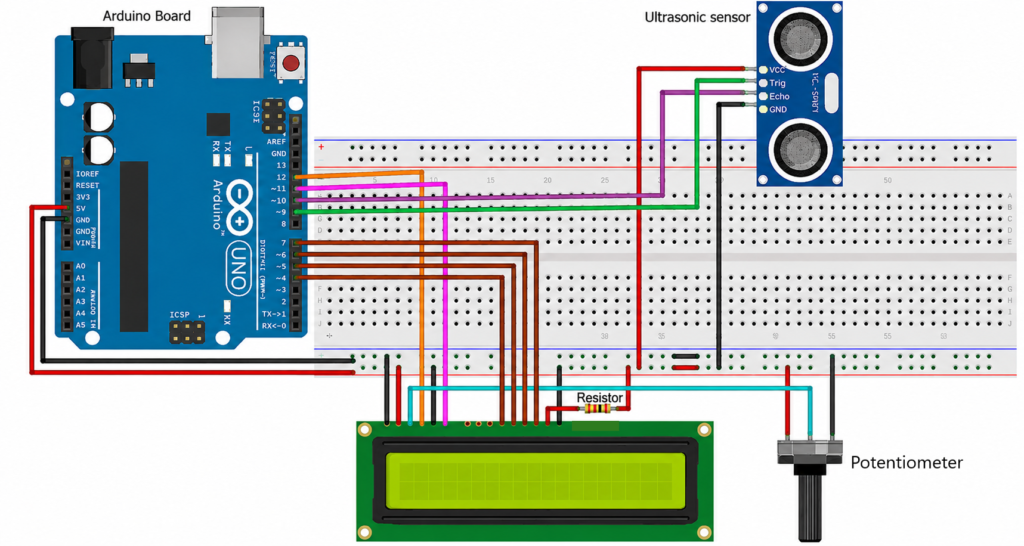
Circuit Connections
Ultrasonic Sensor
| HC-SR04 | Arduino |
|---|---|
| VCC | 5V |
| GND | GND |
| Trig | Pin 9 |
| Echo | Pin 10 |
LCD Connections
| LCD Pin | Arduino |
|---|---|
| RS | Pin 12 |
| E | Pin 11 |
| D4 | Pin 4 |
| D5 | Pin 5 |
| D6 | Pin 6 |
| D7 | Pin 7 |
| VSS | GND |
| VDD | 5V |
| VO | Potentiometer Middle Pin |
| A | 5V through 220Ω resistor |
| K | GND |
Potentiometer Connections
| Potentiometer | Connection |
|---|---|
| Left Pin | 5V |
| Middle Pin | LCD VO |
| Right Pin | GND |
Arduino Program
The Arduino program performs the following tasks:
- Includes the LiquidCrystal library
- Initializes the LCD
- Configures the ultrasonic sensor pins
- Sends ultrasonic pulses
- Measures echo time
- Calculates distance
- Displays the result on the LCD
- Displays Out of Range if the measured distance falls outside the sensor’s operating range
/*
  Distance Measurement with Ultrasonic Sensor and LCD
  Coding with Arduino for Beginners - Part 7
  www.ettronics.com
*/

#include <LiquidCrystal.h>

// LCD Pins: RS, E, D4, D5, D6, D7
LiquidCrystal lcd(12, 11, 4, 5, 6, 7);

// Ultrasonic Sensor Pins
const int trigPin = 9;
const int echoPin = 10;

// Variables
long duration;
float distance;

void setup()
{
  pinMode(trigPin, OUTPUT);
  pinMode(echoPin, INPUT);

  lcd.begin(16, 2);

  lcd.setCursor(0, 0);
  lcd.print("Distance Meter");

  lcd.setCursor(0, 1);
  lcd.print("Initializing");

  delay(2000);

  lcd.clear();
}

void loop()
{
  // Clear Trigger Pin
  digitalWrite(trigPin, LOW);
  delayMicroseconds(2);

  // Send 10 µs Pulse
  digitalWrite(trigPin, HIGH);
  delayMicroseconds(10);
  digitalWrite(trigPin, LOW);

  // Read Echo Time
  duration = pulseIn(echoPin, HIGH);

  // Calculate Distance (cm)
  distance = duration * 0.0343 / 2.0;

  lcd.setCursor(0, 0);
  lcd.print("Distance:");

  lcd.setCursor(0, 1);

  if (distance >= 2 && distance <= 400)
  {
    lcd.print(distance, 1);
    lcd.print(" cm        ");
  }
  else
  {
    lcd.print("Out of Range ");
  }

  delay(200);
}
Understanding the Program
Including the LCD Library
The program begins by including the LiquidCrystal library, which allows the Arduino to communicate with the LCD display.
Initializing the LCD
The LCD object is created using the Arduino pins connected to the LCD.
Setting Sensor Pins
The Trig pin is configured as an output.
The Echo pin is configured as an input.
Measuring Distance
The Arduino sends a short pulse to the Trig pin.
The sensor transmits ultrasonic waves.
The Echo pin measures how long it takes for the sound to return.
The Arduino converts this travel time into distance using the speed of sound.
Displaying the Result
The calculated distance is displayed on the LCD.
If the object is outside the measurable range, the LCD displays:
Out of RangeTesting the Project
After uploading the code:
- Adjust the LCD contrast using the potentiometer.
- Place an object in front of the sensor.
- Move the object closer.
- Move the object farther away.
The displayed distance should update continuously.
Applications
This project forms the basis of many real-world systems, including:
- Robot obstacle detection
- Smart parking systems
- Water tank level monitoring
- Industrial automation
- Contactless measuring devices
- Security systems
- Automatic doors
- Warehouse automation
Troubleshooting
LCD Shows Nothing
- Check the LCD wiring.
- Adjust the potentiometer.
- Verify power connections.
Incorrect Distance
- Ensure the Trig and Echo pins are connected correctly.
- Remove obstacles blocking the sensor.
- Use a flat object during testing.
LCD Displays Random Characters
- Verify the LCD pin connections.
- Ensure the LiquidCrystal library is included.
- Check that the correct Arduino pins are used in the program.
“Out of Range” Always Appears
- Confirm the object is within approximately 2 cm to 400 cm of the sensor.
- Check the ultrasonic sensor connections.
Conclusion
In this project, you successfully built a contactless digital distance meter using an Arduino Uno, an HC-SR04 Ultrasonic Sensor, and a 16×2 LCD Display.
Along the way, you learned how ultrasonic sensors measure distance, how to interface an LCD with Arduino, and how to write a program that displays real-time measurements. These are essential skills that form the foundation for more advanced Arduino and robotics projects.
In the next lesson, we’ll continue building practical Arduino projects that introduce new sensors, programming concepts, and real-world applications.
Checkout other Arduino Programming Tutorials
Arduino LED Blink Tutorial for Beginners | Coding with Arduino for Young Innovators
Arduino LED Chaser Circuit Project for Beginners | 6 LED Patterns + Push Button Control
LED Distance Indicator with Ultrasonic Sensor Using Arduino UNO (Complete Tutorial)